
[vc_row][vc_column][vc_column_text]
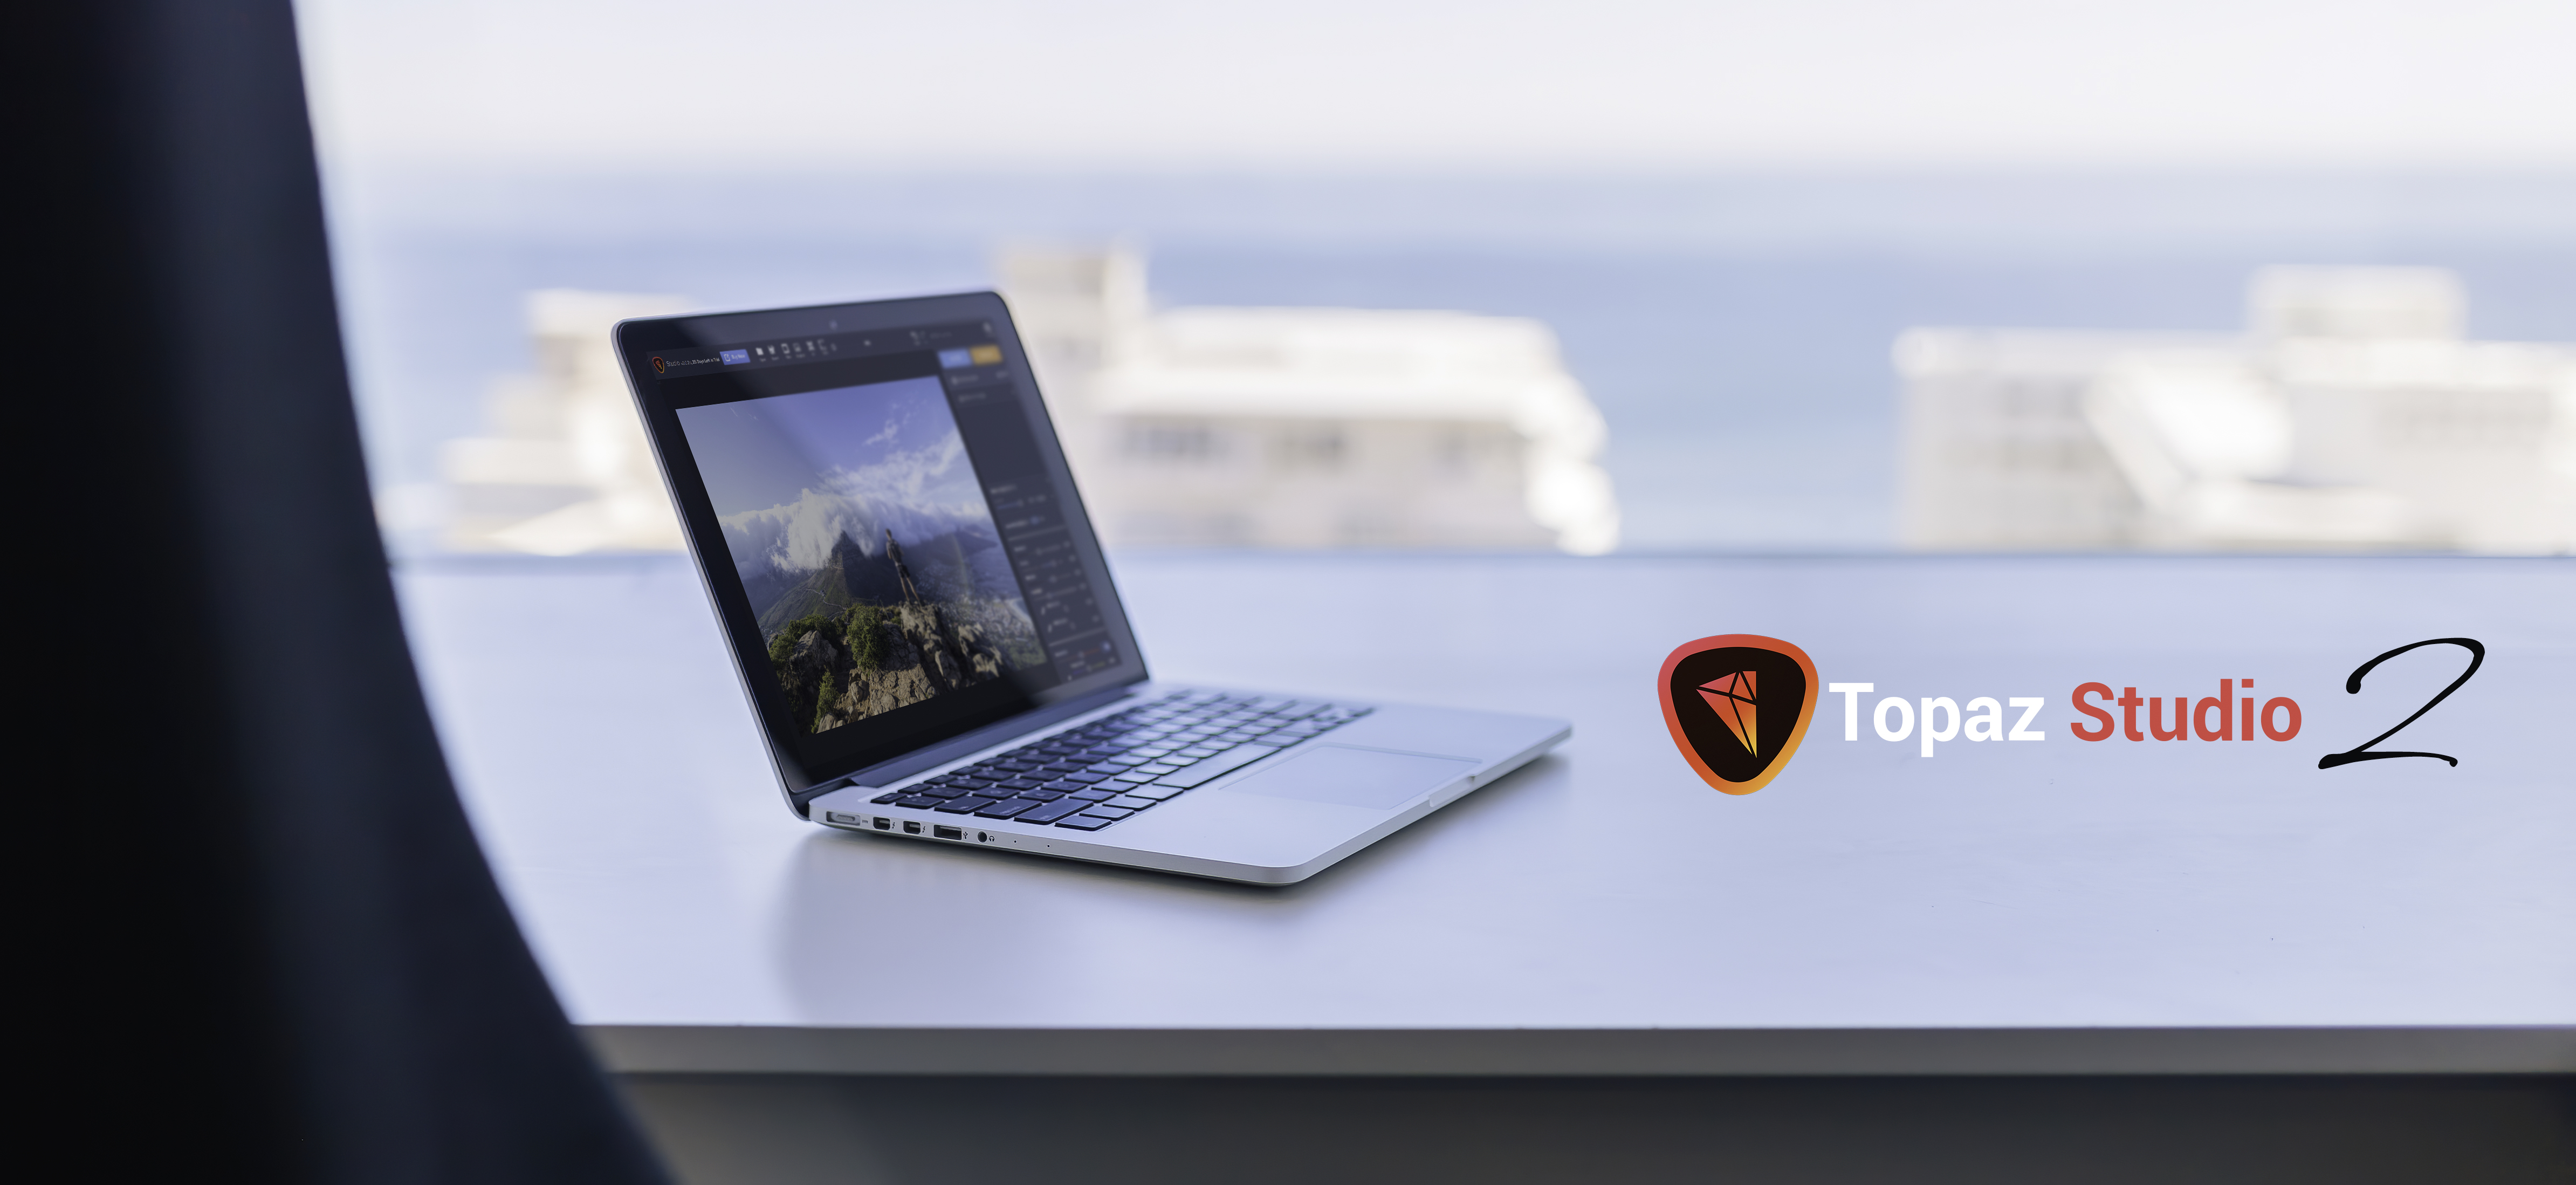
Topaz Studio is a fast, flexible, powerful creative toolbox and it’s the next level image editor for photographers. Topaz Studio gives you lightning fast results with Topaz’s exclusive image processing technology, in an intuitive, affordable, easy to use application.
Topaz Studio a simple to use editing platform with Topaz Labs’ acclaimed photo enhancement technology. It works as both a standalone editor, a plugin within Lightroom and Photoshop, and a host application for other Topaz plugins which means it works exactly how you want it to. Now there’s no more cumbersome workflows that require you to open multiple plugins to achieve your look!
“This is all your Topaz products wrapped into one program.”
Topaz Studio is an easy to use editing solution built with the photographer in mind. This all new editing platform features professionally created 1-click effects, 24 flexible drag and drop Adjustments, and powerful image processing.
And We’re Giving it Away! Yep, you read that right. You’ll get complete freedom to use Topaz Studio as a plugin, a host editor for all Topaz Labs existing products, 10 free adjustments, comprehensive masking, opacity slider, and blending modes functionality all for free. [/vc_column_text][/vc_column][/vc_row][vc_row][vc_column][vc_column_text] [/vc_column_text][/vc_column][/vc_row][vc_row][vc_column][vc_empty_space][vc_column_text]
[/vc_column_text][vc_empty_space height=”15px”][vc_row_inner content_aligment=”center” animation_in_type=”transition.slideUpIn” animation_in_offset=”100″ animation_in_duration=”800″ animation_in_delay=”0″][vc_column_inner width=”1/6″ alignment=”center”][vc_empty_space height=”20px”][/vc_column_inner][vc_column_inner width=”1/3″ alignment=”center”][ucaddon_uc_icon_hover_effect_button text=”Macintosh” icon=”fa fa-apple” link=”http://d2xkriaa67cpt4.cloudfront.net/topazstudio_online_installer.dmg” background_color=”#0f9af8″ uc_fonts_data=”JTdCJTdE”][/vc_column_inner][vc_column_inner width=”1/3″][ucaddon_uc_icon_hover_effect_button text=”Windows” icon=”fa fa-windows” link=”http://d2xkriaa67cpt4.cloudfront.net/topazstudio_online_installer.exe” background_color=”#0f9af8″ uc_fonts_data=”JTdCJTdE”][/vc_column_inner][vc_column_inner width=”1/6″][vc_empty_space height=”20px”][/vc_column_inner][/vc_row_inner][/vc_column][/vc_row][vc_row][vc_column][vc_column_text] [/vc_column_text][/vc_column][/vc_row][vc_row][vc_column][vc_empty_space][vc_column_text]
Working in Topaz Studio is easy! Topaz Studio is set up with the photographer in mind. Whether you’re just getting started with photography or a tried and true professional, Topaz Studio has exactly what you need. With an ever growing library of expertly crafted pre-made effects to professionally crafted assets to artistic and technical tools alike, Topaz Studio is the perfect photographer toolbox, no matter what level of expertise!
[/vc_column_text][/vc_column][/vc_row][vc_row][vc_column][vc_column_text] [/vc_column_text][/vc_column][/vc_row][vc_row][vc_column][vc_empty_space][vc_column_text]
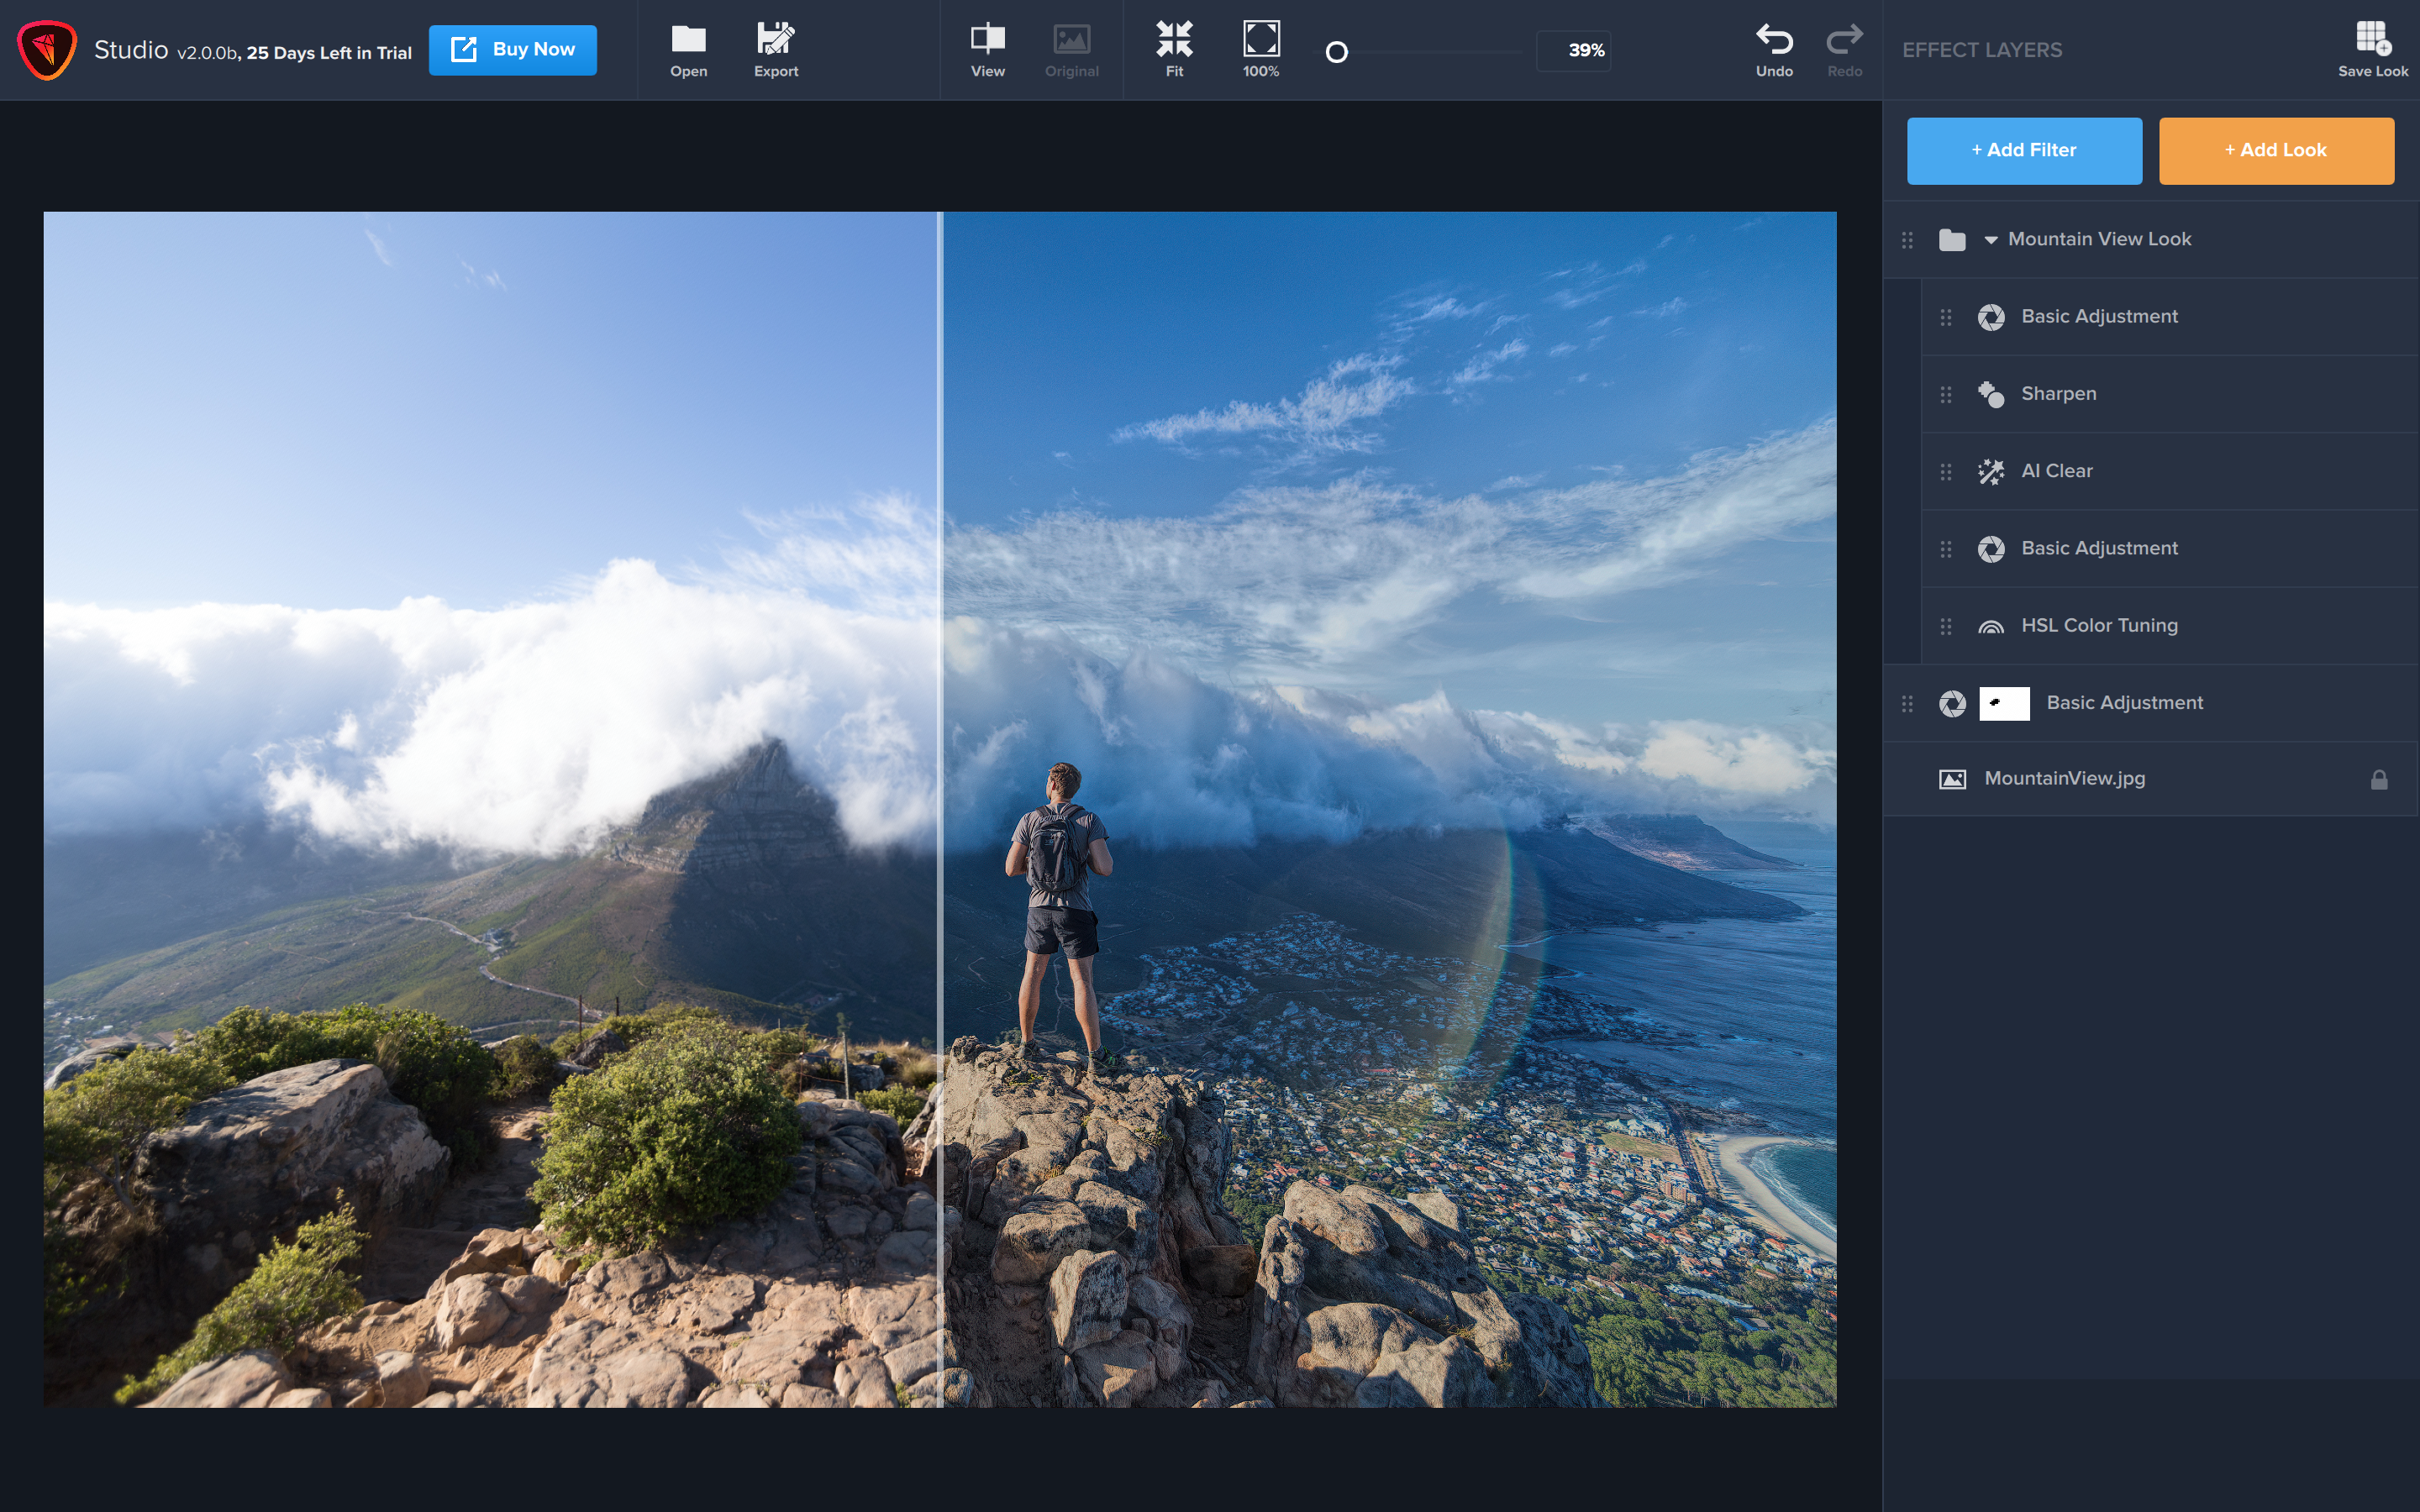
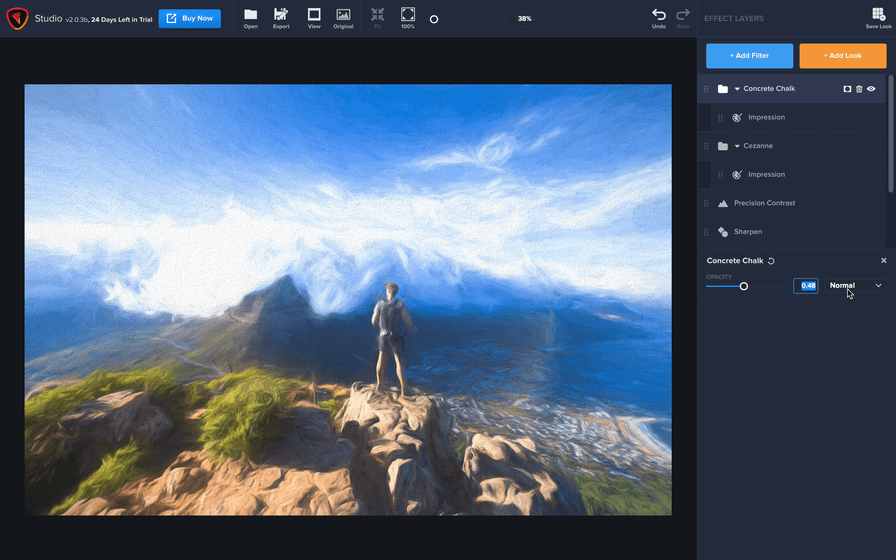
[/vc_column_text][vc_empty_space height=”15px”][vc_single_image image=”8352″ img_size=”full” alignment=”center”][vc_column_text]Topaz Studio features an easy to use Toolbar, a fast and fun Effect Panel with search buttons and features, the workspace, an Image Browser, the Scopes panel, and the Adjustment Panel, complete with Adjustment Buttons. [/vc_column_text][/vc_column][/vc_row][vc_row][vc_column][vc_column_text] [/vc_column_text][/vc_column][/vc_row][vc_row][vc_column][vc_empty_space][/vc_column][/vc_row][vc_row][vc_column][vc_column_text] [/vc_column_text][/vc_column][/vc_row][vc_row][vc_column width=”2/3″][vc_column_text]
[/vc_column_text][vc_empty_space height=”15px”][vc_single_image image=”8360″ img_size=”large” onclick=”link_image”][/vc_column][vc_column width=”1/3″][vc_empty_space][vc_column_text]The Main Toolbar gives you options to open and save images, an option for comparing the before image and after image, zooming, and split views. You can also click the Open Button to open additional images and save images with the Save Button and Save As Button. [/vc_column_text][/vc_column][/vc_row][vc_row][vc_column][vc_column_text] [/vc_column_text][/vc_column][/vc_row][vc_row][vc_column][vc_empty_space][vc_column_text]
[/vc_column_text][vc_row_inner][vc_column_inner width=”1/6″][vc_empty_space height=”15px”][vc_single_image image=”8429″ img_size=”medium” alignment=”center”][/vc_column_inner][vc_column_inner width=”5/6″][vc_column_text]
Save or Save As Images. Save edited images as PNG, JPG, or TIFF files with easy to locate buttons in the Main Toolbar, by using shortcut keys (Command S or Command Shift S), or by going to Menu > File > Save or Save As. [/vc_column_text][/vc_column_inner][/vc_row_inner][vc_empty_space][/vc_column][/vc_row][vc_row][vc_column][vc_column_text] [/vc_column_text][/vc_column][/vc_row][vc_row][vc_column width=”2/3″][vc_column_text]
[/vc_column_text][vc_empty_space height=”15px”][vc_single_image image=”8357″ img_size=”large” onclick=”link_image”][/vc_column][vc_column width=”1/3″][vc_empty_space][vc_column_text]When you first load an image, you’ll see Featured Effects in the Effect Panel. Here you can search for effects by typing an author name, an effect name, tags, or categories. [/vc_column_text][/vc_column][/vc_row][vc_row][vc_column][vc_column_text] [/vc_column_text][/vc_column][/vc_row][vc_row][vc_column][vc_empty_space][vc_column_text]
[/vc_column_text][vc_row_inner][vc_column_inner width=”1/6″][vc_empty_space height=”15px”][vc_single_image image=”8485″ img_size=”full” alignment=”center”][/vc_column_inner][vc_column_inner width=”5/6″][vc_column_text]Click the Grid Button to see more effects at a time. Once in Grid View, click the List Button to see a single column list of effects. [/vc_column_text][/vc_column_inner][/vc_row_inner][vc_empty_space][/vc_column][/vc_row][vc_row][vc_column][vc_column_text] [/vc_column_text][/vc_column][/vc_row][vc_row][vc_column width=”2/3″][vc_column_text]
[/vc_column_text][vc_empty_space height=”15px”][vc_single_image image=”8358″ img_size=”large” onclick=”link_image”][/vc_column][vc_column width=”1/3″][vc_empty_space][vc_column_text]The Effect Buttons give you access to a list of Categories and Tags to search for effects quickly and easily. Click the More Button to see a full list of all available categories and tags. [/vc_column_text][/vc_column][/vc_row][vc_row][vc_column][vc_column_text] [/vc_column_text][/vc_column][/vc_row][vc_row][vc_column][vc_empty_space][/vc_column][/vc_row][vc_row][vc_column][vc_column_text] [/vc_column_text][/vc_column][/vc_row][vc_row][vc_column width=”2/3″][vc_column_text]
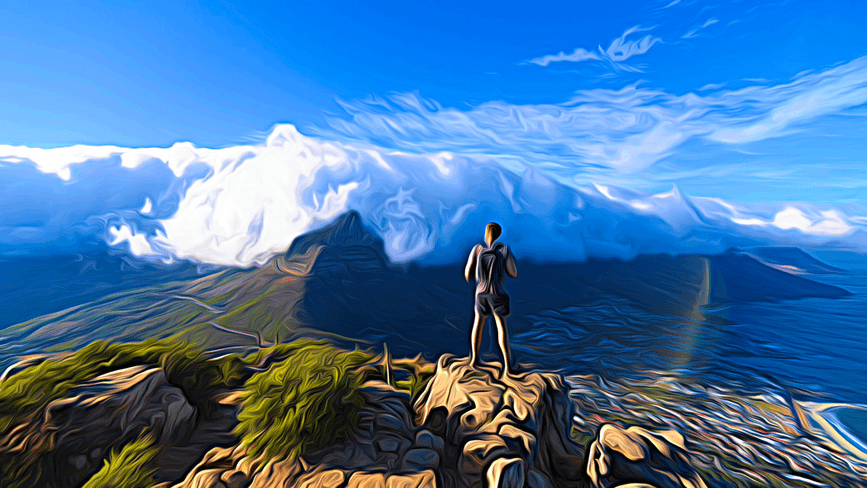
[/vc_column_text][vc_empty_space height=”15px”][vc_single_image image=”8356″ img_size=”large” onclick=”link_image”][/vc_column][vc_column width=”1/3″][vc_empty_space][vc_column_text]The Canvas area is where your active image will be displayed. Easily change the view options of the Canvas with the Main Toolbar, found in section 1 above. [/vc_column_text][/vc_column][/vc_row][vc_row][vc_column][vc_column_text] [/vc_column_text][/vc_column][/vc_row][vc_row][vc_column][vc_empty_space][/vc_column][/vc_row][vc_row][vc_column][vc_column_text] [/vc_column_text][/vc_column][/vc_row][vc_row][vc_column width=”2/3″][vc_column_text]
[/vc_column_text][vc_empty_space height=”15px”][vc_single_image image=”8359″ img_size=”large” onclick=”link_image”][/vc_column][vc_column width=”1/3″][vc_empty_space][vc_column_text]Use the Image Browser to view and adjust various edits of an image side by side or work on several images at once.
Select Show Options to access the menu.
Apply – Apply the adjustments to the image and use the result to start a new project.
Duplicate – Duplicate an entire project and then add it as a new project.
Copy / Paste – Copy the entire adjustment stack and paste them onto a different project. [/vc_column_text][/vc_column][/vc_row][vc_row][vc_column][vc_column_text] [/vc_column_text][/vc_column][/vc_row][vc_row][vc_column][vc_empty_space][/vc_column][/vc_row][vc_row][vc_column][vc_column_text] [/vc_column_text][/vc_column][/vc_row][vc_row][vc_column][vc_column_text]
[/vc_column_text][vc_empty_space height=”15px”][vc_single_image image=”8361″ img_size=”large” alignment=”center”][vc_column_text]At the top right of the application is the Scopes Panel that features 4 separate views. The first allows you to view the Histogram of the image. The second displays the Hue, Saturation, and Luminance of the image, while the third button displays the amount of image Details. Finally, the fourth button helps you navigate your image while zoomed in. [/vc_column_text][/vc_column][/vc_row][vc_row][vc_column][vc_column_text] [/vc_column_text][/vc_column][/vc_row][vc_row][vc_column][vc_empty_space][/vc_column][/vc_row][vc_row][vc_column][vc_column_text] [/vc_column_text][/vc_column][/vc_row][vc_row][vc_column width=”2/3″][vc_column_text]
[/vc_column_text][vc_empty_space height=”15px”][vc_single_image image=”8355″ img_size=”large” onclick=”link_image”][/vc_column][vc_column width=”1/3″][vc_empty_space][vc_column_text]The Adjustment Panel is where you can modify effects or create your own. It gives you control over the large range of tools and adjustments located in the Adjustment Buttons. The Adjustment Buttons features some of the most commonly used adjustments, and you can see all available adjustments by clicking the “More” button at the bottom of the list. [/vc_column_text][/vc_column][/vc_row][vc_row][vc_column][vc_column_text] [/vc_column_text][/vc_column][/vc_row][vc_row][vc_column][vc_empty_space][vc_column_text]
[/vc_column_text][vc_row_inner][vc_column_inner width=”1/6″][vc_empty_space height=”15px”][vc_single_image image=”8430″ img_size=”medium” alignment=”center”][/vc_column_inner][vc_column_inner width=”5/6″][vc_column_text]
Save and Share Your Effects. Save your new effect by clicking the Save button and share your creation with others by selecting ‘Yes’ in the Public field. Your effect will be shared to the entire Topaz Community instantly! [/vc_column_text][/vc_column_inner][/vc_row_inner][vc_empty_space][/vc_column][/vc_row][vc_row][vc_column][vc_column_text] [/vc_column_text][/vc_column][/vc_row][vc_row][vc_column width=”2/3″][vc_column_text]
[/vc_column_text][vc_empty_space height=”15px”][vc_single_image image=”8354″ img_size=”large” onclick=”link_image”][/vc_column][vc_column width=”1/3″][vc_empty_space][vc_column_text]The Adjustment Buttons gives you access to a list of commonly used Adjustments like Crop, Lens Correction, Basic Adjustment, and more. Click the More Button to see a full list of all available Adjustments. [/vc_column_text][/vc_column][/vc_row][vc_row][vc_column][vc_column_text] [/vc_column_text][/vc_column][/vc_row][vc_row][vc_column][vc_empty_space height=”15px”][vc_column_text]
[/vc_column_text][/vc_column][/vc_row][vc_row][vc_column][vc_column_text] [/vc_column_text][/vc_column][/vc_row][vc_row][vc_column width=”1/4″][vc_empty_space height=”15px”][vc_single_image image=”8503″ img_size=”” alignment=”center”][/vc_column][vc_column width=”3/4″][vc_column_text]We’ve also included a tools section. You’ll find lens correction, global masking (with 5 styles and 4 different tools to customize the overall effect), and crop and rotate. Everything is located in a simple to use toolbar with easy-to-use sliders and functionality. [/vc_column_text][/vc_column][/vc_row][vc_row][vc_column][vc_column_text] [/vc_column_text][/vc_column][/vc_row][vc_row][vc_column][vc_empty_space][vc_column_text]
[/vc_column_text][vc_column_text]
Customize your workspace windows with just the click of a button. The Effect Panel, Scopes Panel, Adjustment Panel, and Image Browser can each be collapsed by clicking the arrow on the bar on the inside edge of the panel. The Effect Buttons and Adjustment Buttons can also be collapsed and expanded by clicking at the top of the toolbar. [/vc_column_text][vc_empty_space][/vc_column][/vc_row][vc_row][vc_column][vc_column_text] [/vc_column_text][/vc_column][/vc_row][vc_row][vc_column][vc_column_text]
[/vc_column_text][/vc_column][/vc_row][vc_row][vc_column][vc_column_text] [/vc_column_text][/vc_column][/vc_row][vc_row][vc_column width=”1/4″][vc_empty_space height=”15px”][vc_single_image image=”8501″ img_size=”large”][/vc_column][vc_column width=”3/4″][vc_column_text]Adjustments are the core of Topaz Studio, they are built with very focused functionality in mind. Adjustments may be used independently or combined to create extremely unique looks and custom effects. Currently, there are 24 Adjustments available covering everything from simple Film Grain, to advanced color control with Color Theme. Adjustments are grouped according to complexity, with Common Adjustments appearing at the top, Advanced Adjustments in the next section, Artistic Effect Adjustments below that, and Compositing Adjustments appearing last.
While many of these adjustments are free, some must be purchased to allow you to fully customize the sliders they contain. However, each paid adjustment also comes with a 30 day free trial. To activate the trial, just click the Try Pro Button to activate it or use the Buy Now Button to be taken to the Topaz Studio website to complete your purchase. Whether you purchase adjustments or not, you’ll always have access to Blending Modes, Masking, Opacity, and the included Adjustment Level Presets… all for free. You can always use effects that contain paid adjustments you don’t own as well.
With Topaz Studio Adjustments, you can add, customize, mask, rearrange, and delete Adjustments until you have exactly the look you want.
Free Adjustments: Basic Adjustment, Brightness Contrast, Blurs, Color Overlay, Dual Tone, Film Grain, Image Layer, Posterize, Tone Curves, and Vignette.
Pro Adjustments: Abstraction, Black & White, Bloom, Color Theme, DeHaze, Edge Exposure, Focal Blur, HSL Color Tuning, Precision Contrast, Reduce Noise, Radiance, Sharpen, Smudge, and Texture.
To learn about the Adjustments, check out our short videos on YouTube. [/vc_column_text][/vc_column][/vc_row][vc_row][vc_column][vc_column_text] [/vc_column_text][/vc_column][/vc_row][vc_row][vc_column][vc_empty_space][vc_column_text]
[/vc_column_text][/vc_column][/vc_row][vc_row][vc_column][vc_column_text] [/vc_column_text][/vc_column][/vc_row][vc_row][vc_column][vc_empty_space height=”15px”][vc_single_image image=”8497″ img_size=”large”][vc_empty_space height=”15px”][vc_column_text]The Topaz Studio Integrated Masking is unlike anything you have seen before. We have included 5 masking types: Brush, Spot, Gradient, Color, and Luminosity, as well as a mask adjustments panel and an option to invert or completely reset your mask. Our brush masking includes intuitive, content-aware technology that was developed in house. I’ve gotten the chance to play with it quite a bit – it’s awesome and a complete time saver to say the least. Not only are the new masking features amazing, but you can now combine masking types. After making adjustment with one type of mask, click apply or switch to another mask type and build upon that mask. It’s never been so easy! [/vc_column_text][/vc_column][/vc_row][vc_row][vc_column][vc_column_text] [/vc_column_text][/vc_column][/vc_row][vc_row disable_element=”yes”][vc_column width=”1/2″][vc_column_text]
[/vc_column_text][vc_empty_space height=”15px”][vc_single_image image=”8443″ img_size=”large” onclick=”link_image”][/vc_column][vc_column width=”1/2″][vc_empty_space][vc_column_text]Topaz Studio also has the community! You can share effects that have multiple adjustments or that include just a single adjustment. We have given you complete control. But what happens if someone shares a preset that contains an adjustment that you don’t own? Well, don’t worry! You’ll still be able to use that preset. Adjustments that you don’t own will be locked within that preset and will not allow you to make changes to that particular adjustment. [/vc_column_text][/vc_column][/vc_row][vc_row][vc_column][vc_column_text] [/vc_column_text][/vc_column][/vc_row][vc_row][vc_column][vc_empty_space][vc_column_text]
All you need is a Topaz Studio account to access your software. Existing users use their same login info, while new users can create an account. You will only have to have an internet connection every 60 days to authenticate your account.
[/vc_column_text][vc_empty_space][vc_row_inner][vc_column_inner width=”1/2″][vc_column_text]
Compatibility:
Photoshop CS4+, Photoshop CC, Photoshop Elements 12+, Paintshop Pro X 6+, Serif PhotoPlus X5+, Lightroom 4+, Lightroom CC, and photoFXlab
*Not compatible with Fusion Express
[/vc_column_text][/vc_column_inner][vc_column_inner width=”1/2″][vc_column_text]
System Requirements:
Mac OSX 10.9+
Windows 7/8/10 x 64bit + OpenGL 3.3
RAM: ≥4GB
GPU VRAM: ≥1GB
*Does not support Windows 32bit
[/vc_column_text][/vc_column_inner][/vc_row_inner][/vc_column][/vc_row][vc_row][vc_column][vc_column_text] [/vc_column_text][/vc_column][/vc_row][vc_row][vc_column][vc_empty_space][vc_column_text]
[/vc_column_text][vc_empty_space height=”15px”][vc_row_inner content_aligment=”center” animation_in_type=”transition.slideUpIn” animation_in_offset=”100″ animation_in_duration=”800″ animation_in_delay=”0″][vc_column_inner width=”1/6″ alignment=”center”][vc_empty_space height=”20px”][/vc_column_inner][vc_column_inner width=”1/3″ alignment=”center”][ucaddon_uc_icon_hover_effect_button text=”Macintosh” icon=”fa fa-apple” link=”http://d2xkriaa67cpt4.cloudfront.net/topazstudio_online_installer.dmg” background_color=”#0f9af8″ uc_fonts_data=”JTdCJTdE”][/vc_column_inner][vc_column_inner width=”1/3″][ucaddon_uc_icon_hover_effect_button text=”Windows” icon=”fa fa-windows” link=”http://d2xkriaa67cpt4.cloudfront.net/topazstudio_online_installer.exe” background_color=”#0f9af8″ uc_fonts_data=”JTdCJTdE”][/vc_column_inner][vc_column_inner width=”1/6″][vc_empty_space height=”20px”][/vc_column_inner][/vc_row_inner][/vc_column][/vc_row][vc_row][vc_column][vc_column_text] [/vc_column_text][/vc_column][/vc_row][vc_row][vc_column][vc_empty_space][vc_column_text]
Topaz Studio is designed to be easy to update, by prompting you when updates are available and allowing you to update your application without having to go through an entirely new installation through the new update manager application included with Topaz Studio. [/vc_column_text][/vc_column][/vc_row][vc_row][vc_column][vc_column_text] [/vc_column_text][/vc_column][/vc_row][vc_row][vc_column][vc_column_text]
That’s all for now but keep an eye out for additional updates and new features in the application, online on our social media sites and always on the Topaz Studio Website at topazlabs.com! [/vc_column_text][/vc_column][/vc_row][vc_row][vc_column][vc_column_text] [/vc_column_text][/vc_column][/vc_row][vc_row][vc_column][vc_empty_space height=”15px”][vc_empty_space height=”15px”][vc_column_text]
[/vc_column_text][vc_empty_space height=”15px”][vc_row_inner][vc_column_inner width=”1/4″][vc_single_image image=”8523″ img_size=”” alignment=”center” style=”vc_box_circle_2″][/vc_column_inner][vc_column_inner width=”3/4″][vc_column_text]Jodi is currently the Art Director of Topaz Labs. She has been an artist and photographer for over 15 years, starting with black and white film photography and alternative processing. After completing her BFA in Studio Art from Southern Methodist University and her Masters in Photography from Savannah College of Art and Design, she worked in product photography for companies such as Heritage Auctions, Neiman Marcus, and the Dallas Cowboys. [/vc_column_text][/vc_column_inner][/vc_row_inner][vc_empty_space height=”15px”][vc_empty_space height=”15px”][/vc_column][/vc_row]
 Adjust AI
$79.99
Adjust AI
$79.99
 Gigapixel AI
$99.00
Gigapixel AI
$99.00
 Mask AI
$99.99
Mask AI
$99.99
 Image Quality Bundle
From: $0.00
Image Quality Bundle
From: $0.00
 Topaz Studio 2
$99.99
Topaz Studio 2
$99.99


