[vc_row][vc_column][vc_empty_space][vc_column_text]Tutorial created Topaz Studio V1.0.9[/vc_column_text][vc_column_text]
What is the Film Grain Adjustment?
[/vc_column_text][vc_empty_space height=”15px”][vc_column_text]The Topaz Studio Film Grain Adjustment makes it completely effortless to to create a vintage effect on images. Digital photography has eliminated certain elements such as film grain, traditionally found in film photography. Add that traditional, nostalgic feel and interesting surface texture back into images. For many of you not familiar with film gain, I’ll give you a little bit of the history behind it.
What is Film Grain? Film grain is a random texture that is found on processed photography film due to small particles of metallic silver being present during processing. These particles developed from silver halide which received enough protons during the photography process.
Why add it? Adding film grain to digital photos will make images appear as if they were developed in a dark room. Film grain also works great in small amounts to remove the plastic look from subjects.[/vc_column_text][/vc_column][/vc_row][vc_row][vc_column][vc_empty_space][vc_column_text]
Free Download
[/vc_column_text][vc_empty_space height=”15px”][vc_column_text]The Film Grain Adjustment is available within Topaz Studio as a Free Adjustment. If you’d like to check out everything that is free within Topaz Studio, I suggest checking out our What’s Free article. If you’d like to follow along with the Film Grain Adjustment, you can click the links below to download Topaz Studio.[/vc_column_text][vc_empty_space height=”15px”][vc_row_inner][vc_column_inner width=”1/2″][vc_btn title=”Windows” shape=”square” color=”primary” align=”center” button_block=”true” link=”url:https%3A%2F%2Ftopazlabs.com%2Ffilm-grain%2Fref%2F47%2F%3Fcampaign%3DFilmGrain_07%2F2017_Blog_FilmGrainPage|||”][/vc_column_inner][vc_column_inner width=”1/2″][vc_btn title=”Mac” shape=”square” color=”primary” align=”center” button_block=”true” link=”url:https%3A%2F%2Ftopazlabs.com%2Ffilm-grain%2Fref%2F47%2F%3Fcampaign%3DFilmGrain_07%2F2017_Blog_FilmGrainPage|||”][/vc_column_inner][/vc_row_inner][/vc_column][/vc_row][vc_row][vc_column][vc_empty_space][vc_column_text]
What We Will Cover in This Tutorial
[/vc_column_text][vc_empty_space height=”15px”][vc_column_text]1. Basic Usage of the Film Grain Adjustment
2. How to Edit with the Film Grain Adjustment
3. Editing Skin with the Film Grain Adjustment[/vc_column_text][/vc_column][/vc_row][vc_row][vc_column][vc_empty_space][vc_column_text]
Reading not your Thing? Watch the Full Tutorial!
[/vc_column_text][vc_column_text]If you’d like a more hands on approach to learning the Film Grain Adjustment, check out this short tutorial video. Hope you enjoy.[/vc_column_text][vc_empty_space height=”15px”][vc_video link=”https://youtu.be/F14ksoQw5iU”][vc_empty_space][/vc_column][/vc_row][vc_row][vc_column][vc_column_text]
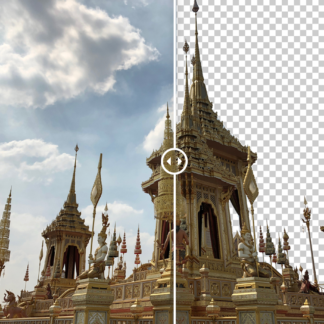
1. Basic Usage of the Film Grain Adjustment
[/vc_column_text][vc_row_inner][vc_column_inner width=”2/3″][vc_empty_space height=”15px”][vc_single_image image=”57369″ img_size=”large” onclick=”link_image”][/vc_column_inner][vc_column_inner width=”1/3″][vc_empty_space][vc_column_text]The film Grain Adjustment features 3 sliders and 2 grain color options to allow complete control on how the film grain will affect your image. After applying the Film Grain Adjustment to your image, you will see a 3 slider panel pop up in the adjustments panel.[/vc_column_text][/vc_column_inner][/vc_row_inner][vc_empty_space][/vc_column][/vc_row][vc_row][vc_column][vc_column_text]
Breakdown of the Sliders
[/vc_column_text][vc_empty_space][vc_row_inner][vc_column_inner width=”1/4″][vc_empty_space][vc_empty_space][vc_single_image image=”57370″ img_size=”large” onclick=”link_image”][/vc_column_inner][vc_column_inner width=”3/4″][vc_column_text]
The sliders and what they do:
1. Strength:
Easily add film grain with the Strength slider. Simply increase the value of the Strength slider and the image will become more grainy.
2. Size:
Choose the size of the grain with the Size slider. Increasing the value of the slider will create larger grain, while decreasing the value of the slider will create smaller grain.
3. Randomness:
Choose how uniform the grain is. Increasing the value of this slider will result in a more random pattern of grain, while decreasing the value of this slider will create a more uniform grain.
4. Noise Type:
The noise type toggle controls whether the grain added will be only gray (monochromatic) or will be colored. I typically use the grey grain for black and white images and the colored grain for colored images.
[/vc_column_text][/vc_column_inner][/vc_row_inner][vc_empty_space][/vc_column][/vc_row][vc_row][vc_column][vc_column_text]
Open Your Image
[/vc_column_text][vc_empty_space height=”15px”][vc_row_inner][vc_column_inner][vc_empty_space height=”15px”][vc_single_image image=”57087″ img_size=”full” alignment=”center” onclick=”link_image”][vc_empty_space][vc_column_text]Before we get started, you’ll want to open an image. If this is your first time opening Topaz Studio, you’ll notice that there is a lot of empty fields. This is because you’ll need to open an image to get started! There is more than one way that you can open an image .
- Drag and drop an image from your computer into the program.
- Click Open (located in the Canvas) and navigate through your files. Select an image and click Open.
- Click Open in the menu bar. Select an image and click Open.
- Go to Menu > File > Open Image… and then select an image and click Open.
- Use your shortcut keys (such as Command O or Control O).
[/vc_column_text][/vc_column_inner][/vc_row_inner][vc_empty_space][/vc_column][/vc_row][vc_row][vc_column][vc_column_text]
Apply the Film Grain Adjustment to Your Image
[/vc_column_text][vc_row_inner][vc_column_inner width=”2/3″][vc_empty_space height=”15px”][vc_single_image image=”57136″ img_size=”large” onclick=”link_image”][/vc_column_inner][vc_column_inner width=”1/3″][vc_empty_space][vc_column_text]After you have successfully opened an image, you will want to apply the Film Grain Adjustment. This can be done one of two ways:
- Clicking Adjustments > Film Grain from the top Menu Bar.
- Clicking More > Film Grain from the Adjustment tool bar located on the right-hand side of your workspace.
[/vc_column_text][/vc_column_inner][/vc_row_inner][vc_empty_space][/vc_column][/vc_row][vc_row][vc_column][vc_column_text]
2. Editing with Film Grain
[/vc_column_text][vc_row_inner][vc_column_inner][vc_empty_space height=”15px”][vc_single_image image=”57369″ img_size=”large” alignment=”center” onclick=”link_image”][vc_empty_space][vc_column_text]If you are planning on adding Film Grain to an image, I would suggest adding it towards the end of the workflow. If you add Film Grain at the bottom of your Adjustment stack, you may see other Adjustments like Precision Contrast (will make the grain stronger) or Reduce Noise (will remove the grain) impact the Film Grain Adjustment. After I added the Film Grain Adjustment, I increased the Size and Strength slider, as well as the randomizer (for a more natural effect) until I was satisfied. I chose to make this grain very visible to give it a really nostalgic feeling.[/vc_column_text][/vc_column_inner][/vc_row_inner][vc_empty_space][/vc_column][/vc_row][vc_row][vc_column][vc_column_text]
The Settings
[/vc_column_text][vc_row_inner][vc_column_inner width=”1/4″][vc_empty_space height=”15px”][vc_single_image image=”57376″ img_size=”large” onclick=”link_image”][/vc_column_inner][vc_column_inner width=”3/4″][vc_empty_space][vc_empty_space][vc_column_text]Here are the settings I used for the Film Grain Adjustment. I would suggest using settings similar to this for very smooth images that you wish to add heavier film grain to.[/vc_column_text][/vc_column_inner][/vc_row_inner][vc_empty_space][vc_column_text]
The Before and After:
[/vc_column_text][vc_empty_space height=”15px”][vc_column_text]I love how this turned out! Reminds me of some of the old photos I find when visiting my grandma.[/vc_column_text][vc_empty_space height=”15px”][vc_row_inner][vc_column_inner width=”1/2″][vc_single_image image=”57138″ img_size=”large” alignment=”center” onclick=”link_image”][vc_empty_space height=”15px”][vc_column_text]
Before
[/vc_column_text][/vc_column_inner][vc_column_inner width=”1/2″][vc_single_image image=”57139″ img_size=”large” alignment=”center” onclick=”link_image”][vc_empty_space height=”15px”][vc_column_text]
After
[/vc_column_text][/vc_column_inner][/vc_row_inner][vc_empty_space][/vc_column][/vc_row][vc_row][vc_column][vc_column_text]
3. Enhancing Skin with Film Grain
[/vc_column_text][vc_column_text]We will be editing the image of this woman below. Her skin looks flawless, but it looks a little too perfect to me. I would like to create a more natural effect. When I’m adding skin texture to colored image, I choose the colored film grain. It creates a much more natural effect.[/vc_column_text][vc_empty_space height=”15px”][vc_single_image image=”57119″ img_size=”large” alignment=”center” onclick=”link_image”][vc_empty_space height=”15px”][vc_row_inner][vc_column_inner width=”1/4″][vc_empty_space height=”15px”][vc_empty_space height=”15px”][vc_single_image image=”57378″ img_size=”large” onclick=”link_image”][/vc_column_inner][vc_column_inner width=”3/4″][vc_column_text]For the first part of this tutorial, I wanted to make sure you were familiar with the Film Grain Controls. For the next part, we will be doing a little bit more advanced effect that uses Topaz Studio’s Integrated Masking.
Built in Functionality. Topaz Studio has a lot of functionality that allows you to perfect how each adjustment affects your image. The functionality is built right into the header next to its name. You will find adjustment level masking, an opacity slider, 28 blending modes, and the ability to duplicate the adjustment![/vc_column_text][/vc_column_inner][/vc_row_inner][vc_empty_space height=”15px”][/vc_column][/vc_row][vc_row][vc_column][vc_column_text]
Add Film Grain to Your Image
[/vc_column_text][vc_row_inner][vc_column_inner width=”2/3″][vc_empty_space height=”15px”][vc_single_image image=”57154″ img_size=”large” alignment=”center” onclick=”link_image”][/vc_column_inner][vc_column_inner width=”1/3″][vc_empty_space][vc_empty_space][vc_empty_space][vc_column_text]Again, I added the Film Grain Adjustment and increased the strength and size slightly, but really increased the Randomizer Slider to give a more natural skin texture.[/vc_column_text][/vc_column_inner][/vc_row_inner][vc_empty_space][/vc_column][/vc_row][vc_row][vc_column][vc_column_text]
The Settings
[/vc_column_text][vc_row_inner][vc_column_inner width=”1/4″][vc_empty_space height=”15px”][vc_single_image image=”57379″ img_size=”large” onclick=”link_image”][/vc_column_inner][vc_column_inner width=”3/4″][vc_empty_space][vc_empty_space][vc_empty_space][vc_column_text]Here are the settings I used for the Film Grain Adjustment. Don’t forget to switch the toggle to colored grain![/vc_column_text][/vc_column_inner][/vc_row_inner][vc_empty_space][vc_column_text]
Adjustment Level Masking
[/vc_column_text][vc_empty_space height=”15px”][vc_row_inner][vc_column_inner width=”1/6″][vc_empty_space height=”15px”][vc_empty_space height=”15px”][vc_single_image image=”46805″ img_size=”large” alignment=”center” onclick=”link_image”][/vc_column_inner][vc_column_inner width=”5/6″][vc_column_text]Next, I am going to slightly mask the highlights and shadows on our subject to create a more natural effect. I’m going to use the adjustment level masking to accomplish this task. To do so, just click on the adjustment level masking icon in the adjustment panel (shown on the left). After you have opened your masking panel, select the luminosity mask.
Not familiar with masking? If you aren’t very familiar with masking, I suggest you check out this masking tutorial over the Topaz Studio Masking here. [/vc_column_text][/vc_column_inner][/vc_row_inner][vc_empty_space][vc_column_text]
Using the Luminosity Mask
[/vc_column_text][vc_row_inner][vc_column_inner width=”1/4″][vc_empty_space height=”15px”][vc_single_image image=”57127″ img_size=”large” alignment=”center” onclick=”link_image”][/vc_column_inner][vc_column_inner width=”3/4″][vc_empty_space][vc_empty_space][vc_column_text]I chose to use the Luminosity Mask because it is the most effective way to select a certain luminosity of an image (in our case the mid-tones) and create the most natural transition. The settings I used for this particular mask are shown to the left. Once you are satisfied with you mask, just click done![/vc_column_text][/vc_column_inner][/vc_row_inner][vc_empty_space][/vc_column][/vc_row][vc_row][vc_column][vc_column_text]
Before and After
[/vc_column_text][vc_empty_space height=”15px”][vc_row_inner][vc_column_inner width=”1/2″][vc_single_image image=”57119″ img_size=”large” alignment=”center” onclick=”link_image”][vc_empty_space height=”15px”][vc_column_text]
Before
[/vc_column_text][/vc_column_inner][vc_column_inner width=”1/2″][vc_single_image image=”57427″ img_size=”large” alignment=”center” onclick=”link_image”][vc_empty_space height=”15px”][vc_column_text]
After
[/vc_column_text][/vc_column_inner][/vc_row_inner][vc_empty_space][vc_column_text]
Don’t forget to Save Your Effect
[/vc_column_text][vc_row_inner][vc_column_inner width=”1/6″][vc_empty_space height=”15px”][vc_single_image image=”46824″ img_size=”medium” alignment=”center” onclick=”link_image”][vc_empty_space height=”15px”][vc_single_image image=”46825″ img_size=”medium” alignment=”center” onclick=”link_image”][/vc_column_inner][vc_column_inner width=”5/6″][vc_column_text]Save and Share Your Effects. If you end up really liking an effect, you can save it to quickly apply next time! You can either save the effect as a preset level (top icon) or global effect (bottom icon). Global presets allow you to share your creation with others by selecting ‘Yes’ in the Public field. Your effect will be shared to the entire Topaz Community instantly![/vc_column_text][/vc_column_inner][/vc_row_inner][vc_empty_space][/vc_column][/vc_row][vc_row][vc_column][vc_column_text]
Gallery
[/vc_column_text][vc_column_text]Saving the effect can be a great way to quickly apply the same setting to multiple images. I used The Black and White Adjustment and the Precision Contrast Adjustment to create more depth to these images before adding the Film Grain Adjustment. I shared this effect to the community of effects as Film Grain Tutorial. It contains a Precision Contrast Adjustment, a B&W Adjustment, and a Film Grain Adjustment with its parameters set to 0.00. Thanks for reading and hope you’ve gained a little more understanding of the usefulness of the Film Grain Adjustment![/vc_column_text][vc_row_inner][vc_column_inner width=”1/2″][vc_empty_space height=”15px”][vc_column_text]
Before
[/vc_column_text][vc_empty_space height=”15px”][vc_single_image image=”57152″ img_size=”large” alignment=”center” onclick=”link_image”][vc_empty_space height=”15px”][vc_single_image image=”57146″ img_size=”large” alignment=”center” onclick=”link_image”][vc_empty_space height=”15px”][vc_single_image image=”57149″ img_size=”large” alignment=”center” onclick=”link_image”][/vc_column_inner][vc_column_inner width=”1/2″][vc_empty_space height=”15px”][vc_column_text]
After
[/vc_column_text][vc_empty_space height=”15px”][vc_single_image image=”57145″ img_size=”large” alignment=”center” onclick=”link_image”][vc_empty_space height=”15px”][vc_single_image image=”57147″ img_size=”large” alignment=”center” onclick=”link_image”][vc_empty_space height=”15px”][vc_single_image image=”57150″ img_size=”large” alignment=”center” onclick=”link_image”][/vc_column_inner][/vc_row_inner][vc_empty_space][/vc_column][/vc_row][vc_row][vc_column][vc_column_text]
Thanks for Reading!
[/vc_column_text][vc_column_text]That’s all I have for today!
We’ll be adding more tutorials and videos so be sure to give us a follow to learn more!
If you’d like to share your images with us, tag us on Instagram with @topazlabs and Twitter with @topazlabs. We’re also on Facebook and YouTube![/vc_column_text][vc_empty_space][/vc_column][/vc_row][vc_row][vc_column][vc_empty_space][vc_column_text]
Free Download
[/vc_column_text][vc_empty_space height=”15px”][vc_row_inner][vc_column_inner width=”1/2″][vc_btn title=”Windows” shape=”square” color=”primary” align=”center” button_block=”true” link=”url:https%3A%2F%2Fopen_beta.s3.amazonaws.com%2Ftopazstudio_online_installer.exe|||”][/vc_column_inner][vc_column_inner width=”1/2″][vc_btn title=”Mac” shape=”square” color=”primary” align=”center” button_block=”true” link=”url:https%3A%2F%2Fopen_beta.s3.amazonaws.com%2Ftopazstudio_online_installer.dmg|||”][/vc_column_inner][/vc_row_inner][/vc_column][/vc_row][vc_row][vc_column][vc_empty_space height=”15px”][vc_separator border_width=”3″][vc_empty_space height=”15px”][vc_column_text]
About Taylor L. Seaton
[/vc_column_text][vc_empty_space height=”15px”][vc_row_inner][vc_column_inner width=”1/6″][vc_single_image image=”8720″ img_size=”medium” alignment=”center” style=”vc_box_circle_2″][/vc_column_inner][vc_column_inner width=”5/6″][vc_column_text]Taylor Seaton is a 2016 graduate from Angelo State University. While attending ASU, she obtained her Bachelor of Fine Arts with a concentration in Graphic Design and an area of emphasis in Business Management and Marketing. She also played volleyball at the collegiate level. She is currently the Social Media Manager at Topaz Labs.[/vc_column_text][/vc_column_inner][/vc_row_inner][vc_empty_space height=”15px”][vc_separator border_width=”3″][vc_empty_space height=”15px”][/vc_column][/vc_row]